Create Cascading Context Menus With the Windows 10 Registry
Manually, that is
 on [Unsplash](https://unsplash.com/s/photos/fractals?utm_source=unsplash&utm_medium=referral&utm_content=creditCopyText)](https://cdn-images-1.medium.com/max/2000/0*SDx-g41shlzqPCv4)
The context menu is an extremely important point of operating systems, especially Windows. Many third-party programs offer ways to edit and modify the context menu, but if you want to make an application that creates a context menu entry, you might have to edit the context menu manually. I found there to be too few resources on this topic, and almost no information on cascading context menus. The articles I did find often had conflicting information, so I wanted to clarify what actually works(as of publishing this article).
Quick Notes
The context menu is sometimes referred to as the shortcut menu.
The context menu is the GUI that appears when you right click, an example being:

- A cascading context menu is a context menu with options that branch off into other options:

- This topic will only refer to adding new entries to the context menu, not changing already existing options.
The Windows Registry
The Windows Registry is basically a database of configuration files that Windows uses. When it comes to editing context menus, all the configurations are stored in the Registry. There are plenty of sources out there if you want to learn more about the Windows Registry, but that strays from the scope of the topic.
Choosing your location
If you haven’t noticed, you get a different context menu depending on where you right click.

And this is important because the options for each context menu have different locations in the registry. This table illustrates the various options:
Opens on a file, for example, means the option will only show when you right click a file, and not a directory. Keep in mind how you want to call a program from the context menu; if you were creating a file sorter, you would probably want to use Directory and Directory Background.
Creating a singular context menu option
Before we get into the fancy stuff, let’s create a basic option. I will use the Directory Background location as an example. Our basic, unedited context menu might look something like this:
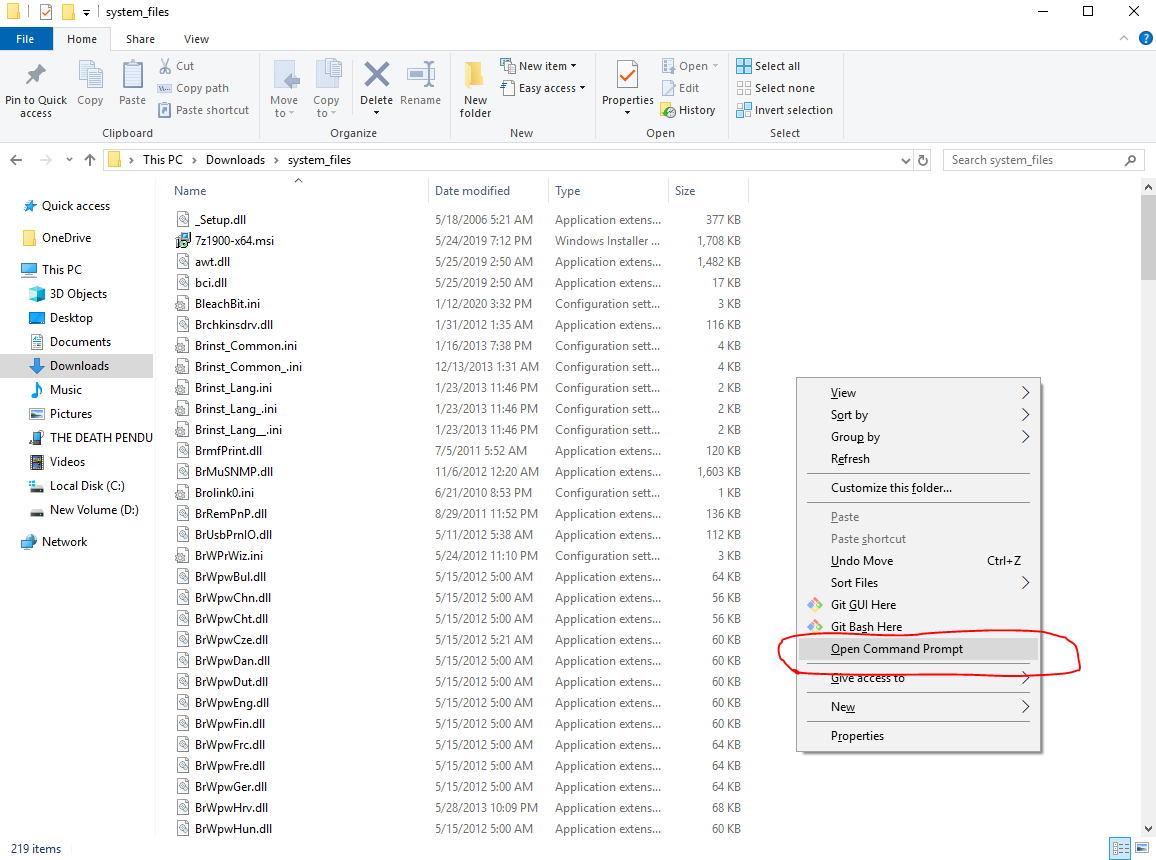
Let’s add an option called Open Command Prompt to open a command prompt in our current directory. The location for the Directory Background is HKEY_CLASSES_ROOT\Directory\Background\shell, so let’s navigate there:

The steps to make a basic command in the registry are as follows:
Create a new key under the shell key.
Name the key what you want the command to be shown as, for me it will be “Open Command Prompt”
Right click the created key and add a new key called command(The sub key must be named command for it to work)
Change the default value of the command key to the code that should be ran when the command is selected(ex: cmd.exe)

Now we have an entry on our context menu that opens on the background of directories and opens a command prompt to the current location:
And just proving it works:

For the perfectionists out there, if you want to add an icon to the context menu entry, do as follows:
Add a new key of type String Value called Icon to the base key
Set the value of the key to the path to the image in ICO format

Creating cascading context menus
Now that we have the basics covered, let’s get into some more advanced usage and create a cascading context menu.
A cascading context menu is a context menu that branches off into multiple options, possibly multiple times. Let’s create a context menu option that opens a list of programs as an example:
The name of the command will be Show Utilities
It will cascade twice(two extra menus)
It will open in Directory Backgrounds.
Steps to making a cascading Context menu
- Create the base key in the same location as the Basic Command. The name of they key does not matter(It will not be the name of the option in the context menu)

Make sure the (default) key is at (value not set)
Add a new String Value to the key just created(type REG_SZ) and call it MUIVerb (type it exactly). Set the data of this variable to the name you want the base key to appear as on the context menu.

- Add a new String value to the key and call it subcommands. Leave the value blank.

- Create a key named shell in the key we just made:

If you want to create another sub menu, repeat steps 1–5 in the created shell key. If you nest multiple menus, you’ll have multiple shell keys. I’ll leave an example at the end.
To create a command that can be selected, it’s identical to creating a single context menu option but in the key we just created. Create a key in the shell key and name it what you want the option to appear as, I will call mine cmd for command prompt. In the created key, make another sub key called command and set the data of the command key to the command you wish to run upon selection.

- Repeat steps 1–6 and 7 as many times as you wish.
For example, the following registry configuration:

Will produce the following context menu:

Closing Statements
Hopefully this showed you how to manually edit and create a context menu. I needed this knowledge to create a file sorter that works from the context menu, and I found it exceedingly difficult to find information on this topic. If you want a working example, check out a project I have made.